Macros
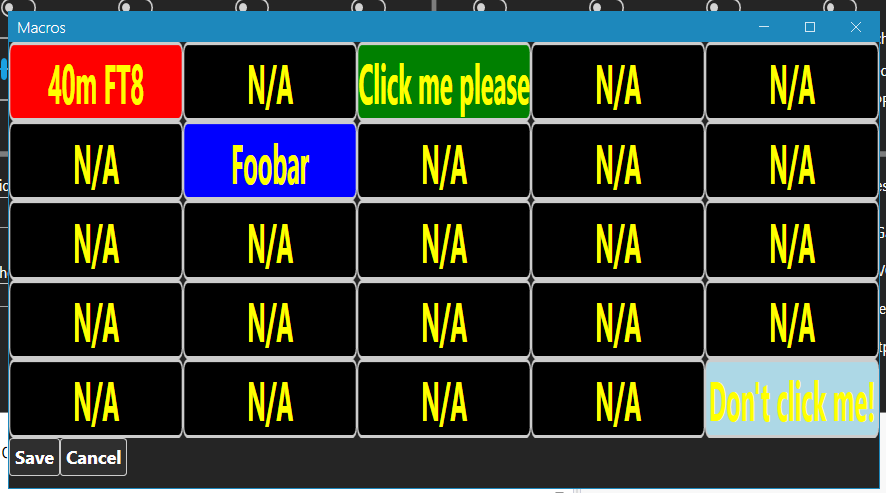
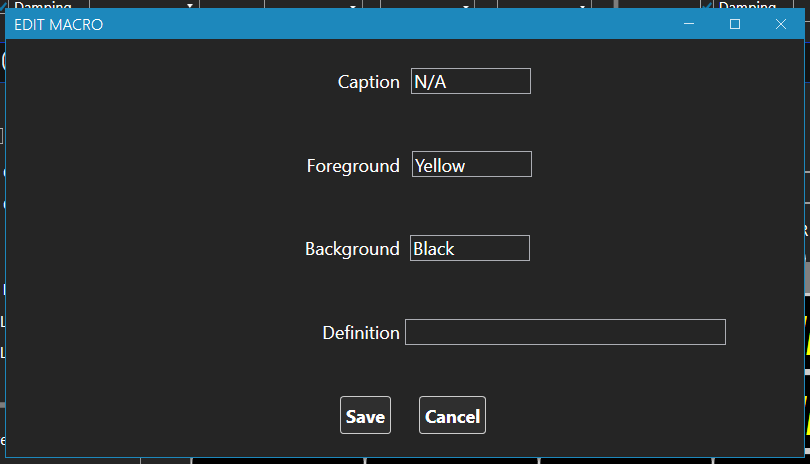
V1.0.9.9 adds a simple Macro function. The "Macros" button (bottom centre of main screen) opens the Macros Window. This is divided into a 5x5 matrix of buttons that can be programmed to perform user defined tasks. A button is programmed by right clicking on it and selecting "Edit" from the context menu that pops up. In the dialogue box, give the macro a title, enter background and foreground colours for it and give it a definition. Currently, you specify colours as text strings - "Yellow", "Red", "LightBlue" etc. Windows recognises a wide range of colours by name - experiment! If you enter a colour that Windows does not recognise, you will get an error message when you try to save the definition. At some point in the future, I'll put in the effort to change these to combo-boxes in order to simplify the data entry.

The macro definition is currently a string containing one or more CAT commands. For example, the string "FA007074000;MD0C;" will prepare you to run 40m FT8 by tuning to 7.074MHz and switching to DUSB mode. Note that each CAT command must be terminated with a semicolon. You can compose the definition string with reference to the FTdx101 CAT command manual. Alternatively, the Trace Window (opened with the TW button) can help - the right hand list pane displays the commands that are sent to the radio. Perform the functions that you want to program onto the macro button via the 101Cats main window while observing the Trace Window (but do note that there will be other traffic displayed as well, so don't copy commands blindly, check them back to the CAT command manual if necessary.

Be careful with the commands you send to the radio - particularly if you are not familiar with driving a radio via CAT commands. It should not be possible to physically damage the radio, but you could get it into a strange state that might require a factory reset!
Starting with V1.2.0.0, the number of macros is user configurable. Currently, this can only be configured by manually editing the macro definition file, Macros.xml. The top-level element of this file now optionally takes the number of rows and columns in the macros matrix as attributes e.g.
For backwards compatibility, these two attributes are optional and default to 5 and 5. If you start 101Cats with an old style macros file and save it, the new attributes will be added. You can manually edit the macros.xml file to change the number of rows and columns, but you will also have to edit any macro definitions in it to make them consistent with the new dimensions of the macros table.
Starting with V1.2.0.1, it is possible to insert user definable delays into the macro definition. Insert a string of one or more hash characters (#) into the definition. The delay string must be terminated with a semi-colon in much the same way as any other macro command. Each hash character in the definition string equates to a delay of 50mS.
Rick (I2BRT) has created a macro file that you may find useful. It can be downloaded via this link. He has supplied the following documentation for it:
DIM LCD
NORMAL LCD
USB DX PEDITION
CW DX PEDITION
SET SPAN to 1
SPAN to 5
SET SPAN to 10
SET SPAN to 20
SET SPAN to 50
SET SPAN to 100
SET SPAN to 200
SET SPAN to 500
SET WATERFALL TO FIXED
SET WATERFALL TO CURSOR
SET WATERFALL TO CENTER
SET WATERFALL LEVEL TO +5
SET WATERFALL LEVEL TO +10
SET MAX POWER OUT TO 50W
SET MAX POWER OUT TO 100W
SET MAX POWER OUT TO 200W